Tuesday, July 10, 2012

Hip Hip Hooray For CSA!

My favorite season is finally here! I love the long warm days of summer but I also love the abundance of fresh summer veggies just as much! Our CSA has begun and it's been fabulous. If you don't know what a CSA is check out this post. http://homemadejess.blogspot.com/2011/10/community-supported-agriculture-are-you.html

This is my third year participating in a CSA. I feel like each year I have a better sense of how to make the most of all the veggies. I have been trying a lot of new recipes lately and thought I could highlight one or more of the veggies from our share in a new recipe each week. We have also been counting our calories so a lot of these recipes are low-cal. Don't let that term fool you! These recipes have been delicious and more than satisfying! So please check in every week for a new recipe. Hopefully you will enjoy them as much as we are!

The first couple weeks of our CSA are made up of a lot of greens. So the first veggie I'm going to highlight is spinach. My husband LOVES spinach any way he can get it. I like it as well but I enjoy it more when it is accompanied by something rather than just steamed. I found this recipe from Whole Foods and gave it a shot. This is by far the best pasta salad I have ever had! My whole family loved it!

Pasta Salad With Grilled Summer Vegetables and Fresh Mozzarella


Ingredients:

  • 1-2 Tbsp extra virgin olive oil
  • 2-3 yellow squash or zucchini, cut on the diagonal into 1/2 inch slices
  • 2 red bell peppers, cored seeded and quartered 
  • 12 oz fusilli pasta, cooked, drained and cooled
  • 2 cups baby spinach leaves
  • 6 oz fresh mozzarella, cut into bite size chunks
  • 1 cup grape tomatoes, halved
  • 1 small red onion, thinly sliced
  • 2 Tbsp chopped basil
  • 1/2 cup balsamic vinaigrette
  • 1/4 tsp salt
  • 1/2 tsp ground black pepper
Directions:
  1. Preheat grill to medium heat. Brush squash and peppers with olive oil and grill, flipping once, until just charred in parts and tender.
  2. Transfer to a plate and set aside to cool. Cut into bite size pieces
  3. In a large bowl, toss grilled veggies with pasta, spinach, mozzarella, tomatoes, basil, vinaigrette, salt and pepper.

This makes 6 servings and is only 300 calories per serving!! Can't beat that! The best part is that you can substitute any of the veggies for whatever you have in the fridge. I bet this would be really good with grilled eggplant. This pasta salad is great for dinner or to bring to a cookout this summer. I guarantee everyone will love it. Give it a try and let me know what you think. Enjoy!

Friday, May 18, 2012

Mother's Day Brunch

I hope everyone had a fantastic Mother's Day! All mom's deserve to be celebrated for all they do for their families 7 days a week, 24 hours a day, 365 days a year. It's a full time job for sure but it's totally worth it! This year I hosted a Mother's Day brunch for my mother-in-law and my mom. We had a total of ten people coming for brunch so I had to figure out what I could make to serve that many people. I also wanted to make items that I could prepare the night before which would allow me to relax on Mother's Day and not have to stress out before people arrived, especially since guests were arriving at 10:30. Here is the menu that I decided on.

  • Yogurt Parfaits
  • Vegetable Egg Souffle
  • Baked Apple-Cinnamon French Toast
  • Zucchini Bread
  • Buttermilk Blueberry Cake
  • Fruit
  • Bagels and Cream Cheese
  • And of course COFFEE!
I was able to make the zucchini bread and blueberry cake the day before. The french toast is supposed to be prepared and left in the fridge for 8 hours so I prepared that the night before. I chopped all the veggies for the egg souffle the night before and put them in the fridge in a zip lock bag so they were ready to go the next morning. These dishes were great for the brunch but would also make a great weekend breakfast. Check them out and give them a try. As always let me know what you think!

Vegetable Egg Souffle

Ingredients:
  • 1 dozen eggs
  • 3 cups of milk
  • 1 bell pepper, slice
  • 1 bunch of asparagus, chopped (reserve a few stalks for the top of the souffle)
  • 1 onion, diced
  • 1 bunch of broccoli, chopped
  • 2 cups of shredded mild cheddar cheese
  • 1 1/2 tsp dry mustard
  • 1 tsp salt
Directions:
  1. Preheat oven to 350 degrees.Saute or microwave veggies to soften.
  2. Beat eggs in a large bowl.
  3. Add veggies, cheese, mustard and salt.
  4. Pour into a greased 9x13 baking dish.
  5. Top with asparagus stalks.
  6. Bake covered for about 50 minutes. Uncover and bake for 20-30 minutes longer or until done.
This recipe is fairly easy when everything is prepped ahead of time. It is also easily adaptable because you can use whatever vegetable you like or have in your fridge! 

Baked Apple-Cinnamon French Toast

Ingredients:
  • 3 cups of nonfat milk
  • 2 cups pasteurized liquid egg whites
  • 3 Tbsp honey
  • 1 1/2 tsp vanilla extract
  • 1/4 tsp salt
  • 1 bag of sliced whole wheat bread
  • 1 cup of chopped dried apple rings (3 ounces)
  • 1/2 cup of raisins
  • 1 1/2 tsp ground cinnamon
  • 1/2 tsp freshly grated nutmeg
  • 1 Tbsp confectioner's sugar
Directions:
  1. Whist milk, egg whites, honey, vanilla and salt in a large bowl.
  2. Trim crusts off 8 slices of bread and set aside. Cut the crusts and remaining bread into 1 inch pieces. Toss the cut bread with dried apples, raisins, cinnamon and nutmeg in a large bowl.
  3. Coat a 9x13 inch baking dish with cooking spray. Transfer the bread mixture to the pan. Lay the reserved crustless slices evenly over the top of the casserole, trimming to fit. Whisk the milk mixture one more time, then pour evenly over the bread. Press the bread down with the back of a wooden spoon, making sure it's evenly moist. Cover with parchment paper, then foil, and refrigerate for at least 8 hours or up to 24 hours.
  4. Preheat oven to 350 degrees.
  5. Bake the casserole, covered, for 49 minutes. Uncover and continue baking until puffed , set and lightly browned, about 29 minutes more. Let stand for 10 minutes; dust with confectioner's sugar and serve with maple syrup if desired.
This was the first time I tried this recipe and it was really good! Best part is that it is a healthy version of baked french toast. Everyone loved it! Let me know what you think.

Yogurt Parfait

Ingredients:
  • Chobani Vanilla Non-Fat Greek Yogurt (or yogurt of your choice)
  • Granola
  • Mixed berries
Directions:
  1. Layer yogurt, granola and fruit into parfait glasses or other pretty glasses.
  2. Serve and enjoy!

Zucchini Bread

Ingredients:
  • 3 cups of all purpose flour
  • 1 tsp salt
  • 1 tsp baking soda
  • 1 tsp baking powder
  • 3 tsp ground cinnamon
  • 3 eggs
  • 1 cup vegetable oil
  • 2 1/4 cups white sugar
  • 3 tsp vanilla extract
  • 2 cups grated zucchini
Directions:
  1. Grease two 8x 4 inch pans. Preheat oven to 350 degrees.
  2. Sift flour, salt, baking powder, baking soda and cinnamon together in a bowl.
  3. Beat eggs, oil, vanilla and sugar together in a large bowl. Add sifted ingredients to the creamed mixture and beat well. Stir in zucchini until well combined
  4. Pour batter into pans.
  5. Bake for 40-60 minutes or until tester inserted in the center comes out clean. Cool in pan on cooling rack for 20 minutes. Remove from pans and cool completely.

Buttermilk Blueberry Breakfast Cake

Ingredients:
  • 1/2 cup unsalted butter, room temperature
  • 2 tsp lemon zest or more
  • 7/8 cup* plus 1 Tbsp sugar**
  • 1 egg, room temperature
  • 1 tsp vanilla
  • 2 cups flour
  • 2 tsp baking powder
  • 1 tsp kosher salt
  • 2 cups fresh blueberries
  • 1/2 cup buttermilk
*7/8 cup = 3/4 cup + 2 Tbsp
**This 1 Tbsp is for sprinkling on top

Directions:
  1. Preheat oven to 350 degrees. Cream butter with lemon zest and 7/8 cup of the sugar until light and fluffy.
  2. Add the egg and vanilla and beat until combined. Meanwhile, toss the blueberries with 1/4 cup of flour, then whisk together the remaining flour, baking powder and salt.
  3. Add the flour mixture to the batter a little at a time, alternating with the buttermilk. Fold in the blueberries.
  4. Grease a 9 inch square baking pan. Spread batter into pan. Sprinkle batter with remaining tablespoon of sugar. Bake for 35 minutes. Check with a toothpick for doneness. Let cool at least 15 before serving.

Try out these recipes for your next family get together or weekend breakfast and let me know what you think! Happy Mother's day to all you wonderful mothers!


Monday, February 27, 2012

Homemade Bread

I have been so terrible about blogging lately! Sorry about that, but I have been trying to perfect the art of fresh baked bread. One of my New Year's resolutions was to start making my own bread. After I read the following article I felt validated!http://health.yahoo.net/experts/eatthis/5-grossest-foods-supermarket
I always tried to choose healthy bread at the grocery store but I spent so much time reading the list of ingredients and still didn't know what half of them were. So this is how my bread making journey began! After much trial and error I have become comfortable enough with this process to share it will all of you.

I started with unbleached white flour and white whole wheat flour (I always use King Arthur Flour).  I also began by using active dry yeast. The first few loaves were successful but then all of a sudden the loaves wouldn't rise anymore. Frustrating to say the least. I also tried to make whole wheat bread but was unsuccessful twice for different reasons. Then I began to use instant yeast and ever since I have been happy with the results. Here is the recipe that I have had success with. It is adapted from the King Arthur website.

Classic 100% Whole Wheat Bread


  • 1 cup water
  • 1/4 cup vegetable oil
  • 1/4 agave nectar ( you can use honey or agave for a sweet loaf, molasses for a darker loaf with an old-fashioned flavor)
  • 3 1/2 - 4 1/2 cups of whole wheat flour
  • 2 1/2 teaspoons of instant yeast
  • 1/4 cup of Baker's Special Dry Milk or nonfat dried milk (I have been using the dried milk. The bakers special can be ordered on the King Arthur site or Amazon. When used it produces a larger rise)
  • 1 1/4 tsp salt
  1. Combine flour, yeast, salt and dry mild in a mixer bowl. Mix with the dough hook to combine.
  2. Meanwhile, heat water, vegetable oil and agave nectar in a small pan over low heat. Warm mixture to 120 to 130 degrees Fahrenheit. *It is important to measure the temperature with a thermometer when using instant yeast. If the water is too hot it will kill the yeast. If it is too cold it will shock the yeast and your bread will not rise. 
  3. Add the water mixture to the bowl and mix on speed 2 until dough starts to form. 
  4. Add more flour 1/2 cup at a time being sure to mix completely before adding more flour. 
  5. When the dough is no longer sticking to the bottom of the bowl and the sides of the bowl are cleaned, knead in the bowl on speed 2 for 6-8 minutes.
  6. Cover the bowl with plastic wrap and let sit for 10 minutes. There is no need to punch the dough down before moving on to the next step.
  7. Lightly grease your workspace ( I use my large cutting board) and rolling pin. Roll the dough into a  8-9" rectangle. Roll the rectangle into a log and pinch the ends to seal. Tuck the ends under and place the log into a greased 8 1/2" x 4 1/2" loaf pan. Cover the pan loosely with lightly greased plastic wrap. I usually place the plastic wrap on the cutting board since I had just greased it when rolling out the dough. This easily greases the plastic wrap just enough.
  8. Allow the dough to rise for 1-2 hours or until the center had crowned about 1" above the rim of the pan.
  9. Preheat oven to 350 degrees and bake the bread for 35-40 minutes.
  10. Remove bread from the oven and place on a rack to cool. If desired, rub the crust with a stick of butter for a soft, flavorful taste.
  11. Cool completely before cutting. Store the bread in a plastic bag at room temperature.
Voila!! I know that the thought of making your own bread might be intimidating but I encourage you to try. You won't regret it... I promise! My family has been enjoying homemade bread for their sandwiches, toast and as a snack! It's just that good when it's homemade! So give it a try and let me know how it goes. Good luck and happy baking!


Thursday, December 22, 2011

Merry Christmas!


It's a couple of days before Christmas and I thought I could share some recipes and ideas that might inspire you. I'm sure most of you have been just as busy as I have been! Shopping, baking, wrapping, more shopping! It can be overwhelming but I hope that you are all enjoying this time of year as well.


Growing up we always celebrated festa dei sette pesci, feast of the seven fishes, on La Vigilia, Christmas Eve. Over the years this celebration has evolved. Last year was the first time that I have hosted at our house. We had done the same thing as years past and ordered fish from Bradford Seafood. It's very good but my grandmother likes fried fish and the rest of us find it to be too much fried food! So my mother and I made an executive decision last year and decided that I would cook the following year. As much as I would love to continue on with the tradition of the seven fish, I don't find it necessary to make seven different fish dishes for eight people! I've decided to keep it simple but homemade and yummy of course! I'm going to make a baked haddock, a fresh salad, and to keep the peace with my grandmother we will make waffle fries! My mother is also going to bring shrimp cocktail. Sounds good to me! Should be delicious! Hopefully my fellow Italian followers will gain some inspiration from this post and realize it's okay to cut back and still stick with your traditions! Buon Natale!


I know not everyone will celebrate Christmas the same but I'm sure a lot of you will celebrate with a cocktail! Here is what I'm going to be mixing up on Christmas Eve.


Candy Cane Martini 
  • 1/2 oz. Peppermint Schnapps
  • 1 1/2 oz. Vanilla Vodka
Fill a shaker with ice, vodka and peppermint schnapps. Shake to mix and strain into a chilled martini glass rimmed with crushed candy canes. Garnish with a mini candy cane! Enjoy!

For dessert I'm going to make my grandmothers favorite dessert. This is a delicious cake/bread that is great for both the fall and winter seasons. I got this recipe from a former co-worker. We used to make it with the kids after a nice apple picking field trip.

Apple Cake
  • 3 cups apples, peeled and chopped (about 3 large apples)
  • 1 cup vegetable oil
  • 3 eggs
  • 2 cups sugar
  • 2 1/2 cups flour
  • 1 tsp baking powder
  • 1 tsp baking soda
  • 1/2 tsp salt
  • 1tsp vanilla
  • 1/2 tsp ground cloves
  • 1/2 tsp ground nutmeg
  • 2 tsp cinnamon
  1. Mix together oil, eggs and sugar and vanilla.
  2. Stir together flour, baking soda, baking powder and spices.
  3. Add to oil mixture.
  4. Stir in apples.
  5. Add 1 cup of raisins and 1 cup of chopped walnuts. (optional)
  6. Bake in two bread pans or 1 bundt pan at 350 degrees for 50-60 minutes.
                                     

This cake is so yummy that it is gone within 24 hours! My grandmother likes to enjoy a slice with a cup of tea or coffee. You can also make a glaze to drizzle over the cake or dust with powdered sugar but it certainly doesn't need it! It is delicious just the way it is!


I am wishing everyone the happiest of holidays! Relax, enjoy and celebrate with your loved ones! 
Buon Natale!


Wednesday, December 14, 2011

Happy Thanksgiving... Better Late Than Never!!

I hope everyone had a fantastic, food filled Thanksgiving! I certainly did! With this busy holiday season fast approaching I have been slacking in the blogging department. I had good intentions of posting my Thanksgiving day menu much earlier but it just didn't happen. Why not post it now?! Of course these recipes are so versatile that they could be made for any gathering or even a nice family dinner during the week. So read on and hopefully you will find something that inspires you!

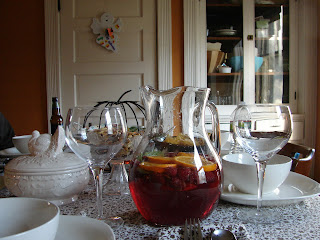
When I knew we were hosting Thanksgiving this year the first thing I thought of was of course.... no, not turkey, a holiday themed beverage!! I found a recipe for punch that sounded festive and delicious so I just had to try it! It was quite fabulous and I recommend you try it.

Thanksgiving Punch 
  • 1 bottle of dry sparkling white wine
  • 3 1/3 oz brandy
  • 3 1/3 oz creme de framboise (raspberry liqueur) I used chambord 
  • 18 oz cranberry juice
  • 8 1/3 oz fresh orange juice
  • handful of fresh cranberries
  • handful of fresh raspberries
  • 2 oranges, sliced
  • sprig of fresh mint
  1. Pour all ingredients into a punch bowl. Stir.
  2. Just before guests arrive add the ice cubes, slices or orange, mint and the berries.

That simple! Okay, a couple of things. First of all you don't have to worry about getting the measurements exactly right. You're mixing a cocktail not baking a cake! Second, if you don't have a punch bowl (which I do not) use a pitcher instead. Third, you may want to add less chambord because it is very sweet. Remember, you can always add more but you can't take it out once it's mixed in the punch! And my last suggestions for this punch is to add all the ingredients (except the ice) rather than waiting for guests to arrive. I found that adding the mint earlier gave the punch a more minty taste. Delish!! So try this out at your next party. You can of course switch out the fruits to suit you liking. Enjoy!


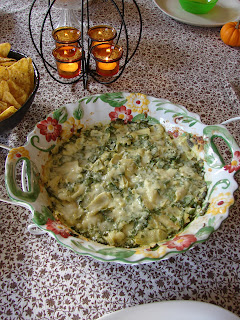
Once I had a nice cocktail I was ready to start cooking! First things first... appetizers. We weren't having many people so I decided to keep it simple. Some easy things that your guests can snack on before the big meal are mixed nuts and cheese and crackers. This is a nice easy way to have something on your table that doesn't require a lot of preparation. Just open a can of nuts and pour them into a pretty bowl. For the cheese and crackers all you have to do is slice the cheese. You can get fancy when arranging them on a plate to add a little extra 'fancy' to a simple appetizer! Along with the nuts, cheese and crackers I did make one appetizer that is always a huge hit whenever I make it! Here it is.

Spinach Artichoke Dip
  • 14 oz artichoke hearts
  • 1 clove of garlic
  • 2 cups of freshly chopped spinach
  • 1/2 cup of mayonnaise
  • grated white cheese
  • salt and pepper to taste
  1. Mix everything except the grated cheese together.
  2. Place the mixture in an oven-proof dish, then top with the cheese.
  3. Bake at 350 degrees for 10-15 minutes or until spinach is tender and the cheese is nicely melted. 
  4. Serve with tortilla chips.

This recipe is so easy to whip up and it's so delicious!! You can always use frozen spinach if you don't have fresh spinach. I usually defrost it in the microwave before adding it to the rest of the ingredients. Make this at your next gathering or bring to the next party you attend and I guarantee it will be a big hit!

To start our dinner off nicely I made a butternut squash soup. Well actually that isn't exactly true! I had picked up our CSA share the Tuesday before Thanksgiving and to my surprise there wasn't any butternut squash in my box! Oh well, that is part of the fun of participating in a CSA. There are no guarantees as to what you will receive each week. We did however get calabsa squash. I had never heard of it either!! It was a very large squash that looked like a pumpkin. I did a little research and found out that it is similar to butternut squash so I figured I might as well use it. It took me quite some time to peel and cut this large squash and when I was finally finished there was a total of just about 8 pounds! Much more than I needed for the soup but that's okay. Now I had a bag of cubed squash in my fridge for  future recipes! My mother in law found this recipe and I really like it! Here it is.

Butternut Squash Soup With Gruyere Toasts
  • 3 Tbsp unsalted butter
  • 1 large onion, chopped
  • 2 large Gala apples, peeled, cored and chopped (you can substitute the Gala apples for another kind of apple,use what you have!)
  • 3 pounds of butternut squash, peeled and cubed (about 8 cups)
  • 1 1/2 inch piece of fresh ginger, thinly sliced
  • 1 box (32oz) of broth, chicken or vegetable
  • 1 cup of apple cider or juice
  • 1/2 tsp kosher salt, or to taste
  • 1/4 tsp freshly ground black pepper
  • 1/2 cup heavy cream
    Gruyere Toasts
    • 16 slices (1/2 inch thick) baguette
    • 2 oz of Gruyere cheese, finely shredded
    1. Melt butter in a 5 quart pot over medium-high heat. Stir in onion and apples. 
    2. Saute 5 minutes or until onion is translucent.
    3. Add butternut squash, ginger, broth, cider or juice, salt and pepper. 
    4. Bring to a boil. Reduce heat, cover and simmer for 20-25 minutes or until vegetable are very soft. 
    5. Let cool for 5 minutes.
    6. Process soup in very small batches in a blender or food processor until smooth(alternately, use an immersion blender to puree.) 
    7. Return soup to the pot and add cream. Season with the salt to taste. Warm over low heat if necessary.
    8. Heat broiler.
    9. Place baguette slices on foil lined baking sheet. Broil 2-3 minutes or until golden brown.
    10. Take toasts out of the oven, turn over and sprinkle each slice with some Gruyere. Broil 2-3 minutes until cheese is bubble and melted. 
    11. Serve soup with one of the Gruyere toasts.
    I love the toasts with this soup! It is so good! If you don't have an immersion blender you should consider getting one. It comes in very handy if you like to make pureed soups. When you are able to puree right in the pot there is one less thing to clean and that is always a bonus!

    Since we are vegetarian I did not make a turkey for our Thanksgiving dinner. Some of our guests do eat turkey though so my mom made the turkey and brought if over with her. I know that turkey is a huge part of Thanksgiving dinner but I have to say that I don't miss the turkey when there are so many delicious sides to fill my plate and my belly! Here is a vegetable recipe that I love because I can use a variety of veggies in one delicious dish! Plus it calls for Gruyere cheese which I used on the toasts in the soup recipe. This way we, and by we I mean my husband, can shred the cheese all at once!

    Root Vegetable Gratin 
    • 3 pounds of assorted root vegetables, peeled and cut into 1/8 inch thick slices
    • 3 table spoons extra virgin olive oil, divided
    • 1 cup of thinly sliced shallots
    • 1 1/3 cups low fat milk, divided
    • 3 tablespoons all purpose flour
    • 1 1/2 cups finely shredded Gruyere cheese, divided
    • 1 tablespoon chopped fresh thyme, or 1 tsp dried
    • 1/2 tsp freshly ground black pepper
    • 1 cup whole wheat breadcrumbs
    1. Preheat oven to 400 degrees. Coat a 9x13 inch baking dish with cooking spray.
    2. If using parsnips, quarter lengthwise and remove the woody core before cutting into slices. 
    3. Cook vegetables in a pot of boiling water until barely tender, about 5 minutes. Drain.
    4. Heat 2 tablespoons of oil in a medium saucepan over medium heat. Add shallots and cook, stirring occasionally, until light brown, 3-4 minutes. Add 1 cup of mild and bring to a simmer. Combine flour and the remaining 1/3 cup of milk in a small bowl to make a smooth paste. Stir into the hot milk and cook, whisking constantly, until the sauce bubbles and thickens, 1-2 minutes. Remove from the heat. Stir in 3/4 cup cheese, thyme, salt and pepper.
    5. Combine breadcrumbs, the remaining 3/4 cup cheese and 1 tablespoon oil in a bowl.
    6. Layer the vegetable slices in the prepared baking dish. Pour the cheese over the top and top with the breadcrumb mixture.
    7. Bake the gratin until it is bubbling and the top is golden, 30-40 minutes. Let cool for 10 minutes before serving.
    I could eat this as my meal and be completely satisfied! So yummy and you can use whatever root veggies you have on hand. I used parsnips, red and golden beets, turnips and carrots.

    Of course we had mashed potatoes, corn and peas but I don't think I need to include any of those recipes! The other thing I made was cranberry sauce. It's so easy to make and it's better than the canned version. Plus you can easily make it ahead of time and not have to worry about it Thanksgiving day. Give it a try! 

    Cranberry Sauce
    • 1 pound of fresh cranberries, washed
    • 1-2 cups of granulated sugar
    • 1/3 cup of water
    • 1 cinnamon stick
    • 1/2 tsp ground allspice
    • 1/4 tsp ground nutmeg
    • 1 orange, zested and juiced
    1. In a medium pot, combine the cranberries, sugar and water. Stir to blend.
    2. Bring the mixture to a boil over medium heat.
    3. Reduce to a simmer and add the cinnamon stick, allspice and nutmeg. Stir to blend and simmer for an additional 5-7 minutes.
    4. Some of the cranberries will burst and some will remain whole.
    5. Add the orange juice and zest, stir and allow to cool before serving.
    It's that easy! Fresh, homemade and no preservatives! Can't go wrong there. I found that it's best to make this ahead of time so that the sauce has time to congeal in the fridge before serving. Personally I find that 2 cups of sugar is way too much! Start by adding 1/2 cup and go from there. Remember, you can always add more but you can't take it out once you put it in. Try this out and add other ingredients such as nuts and soon you'll have your own signature cranberry sauce.


    Of course no meal is complete without fresh baked rolls, well at least at my house! Fresh baked rolls are not as difficult to make as you may think. You can use active dry yeast but I prefer the rapid rise because it's faster and so much easier!

    Classic Dinner Rolls 
    • 1 envelope of rapid rise yeast
    • 2 tablespoons of sugar
    • 1/2 teaspoon of salt
    • 2-2 1/2 cups of flour
    • 1/4 cup of water
    • 1/2 cup of milk
    • 2 tablespoons of butter or margarine
    1. Preheat oven to 375 degrees.
    2. Combine dry ingredients in a mixing bowl (starting with 1-1/2 cups of flour).
    3. Combine wet ingredients in a saucepan and heat on low until butter is melted.
    4. Add milk mixture to the mixing bowl and beat at medium speed.
    5. Add more flour 1/2 cup at a time until a soft dough forms.
    6. Continue to knead with the mixer for an additional 2 minutes. If the dough is sticking to the bottom of the bowl you need to add more flour.
    7. Cover the dough and let sit for 10 minutes.
    8. Grease an 8 inch round pan.
    9. Divide dough into 12 equal pieces and shape into balls. Place in the pan.
    10. Cover and let rise for about 1 hour or until doubled in size.
    11. Uncover and bake rolls for 20-25 minutes or until the rolls are golden brown of the top. Remove from pan and serve.
    These fresh rolls are so yummy, especially nice and warm right out of the oven! I always make these with lasagna! Try it out and you may not ever buy rolls in a tube again!

    Last but not least... dessert! I don't know about you, but by the time I was done with my meal there was no room left for dessert. But none the less we had plenty of it! I decided to make a festive trifle for Thanksgiving dessert. This is where I strayed slightly from my 'homemade' approach. I know, I know... tisk, tisk!! You can make this one from scratch if you like but packaged gingerbread and pudding is what I used. Oh well! Here it is.

    Pumpkin Gingerbread Trifle
    • 1 package of gingerbread mix
    • 1 package of vanilla pudding (I used instant)
    • 1 (30 oz) can of pumpkin pie filling
    • 1/2 cup packed brown sugar
    • 1/3 teaspoon of cinnamon
    • 1 (12 oz) container of cool whip
    • 1/2 cup gingersnaps
    1. Bake the gingerbread according to the packager directions. Cool completely.
    2. Meanwhile, prepare the pudding and store in the fridge until ready to use.
    3. Stir the pumpkin pie filling, sugar and cinnamon into the pudding.
    4. Crumble some of the gingerbread into the bottom of a trifle bowl.
    5. Pour 1/2 of the pudding mixture over the gingerbread, then add a layer of cool whip.
    6. Repeat with the remaining gingerbread, pudding and cool whip. 
    7. Sprinkle the top with crushed gingersnaps.
    So not necessarily homemade but yummy and festive! This trifle can be made so many different ways. You can use chocolate cake, chocolate pudding and as an extra treat add crushed skor bars! This could also be made as a 4th of July trifle by using angle food cake, cool whip and strawberries and blueberries. Try it out, modify it, make it your own!


    Here is a picture of my plate on Thanksgiving. I didn't even have turkey but my entire plate was full... along with my belly! Sadly I was not a member of the clean plate club! Oh well, maybe next year!

    I hope everyone enjoyed their Thanksgiving dinner along with good company. Please try out some of these recipes and let me know what you think. Check back soon because I am going to try my hardest to post some Christmas recipes before Christmas actually arrives! Look forward to another festive cocktail and a delicious dessert! Happy cooking!

    Recipes taken from:
    www.womansday.com
    www.foodnetwork.com
    www.eatingwell.com
    The Complete Home Bartender's Guide http://www.amazon.com/Complete-Home-Bartenders-Guide-Recipes/dp/0806985119


      Sunday, November 13, 2011

      Super Sweet Potatoes!


      No your eyes are not playing tricks on you, that is one gigantic sweet potato!! This big boy was in our CSA box last week. I already had a bunch of sweet potatoes from the previous week so I knew it was time to start making something with sweet potatoes in it! My mother in law had been telling me about a Sweet Potato Flatbread she had made a couple of times so I figured it was time to try it out. It was delicious! Even Tyler liked it! So since it was such a huge success I though I should share this fabulous recipe with others. Try it out... you won't be disappointed!

      Sweet Potato Flatbread

      Ingredients
      • Cornmeal, for the baking sheet
      • 1 lb. pizza dough, thawed if frozen (I of course made mine. Refer to http://homemadejess.blogspot.com/2011/10/october-is-national-pizza-month.html for my pizza dough recipe)
      • 1 medium sweet potato, peeled, halved and thinly sliced
      • 2 shallots, thinly sliced
      • 4 oz. extra sharp cheddar cheese, shredded
      • 1 Tbsp. fresh thyme
      • 1/4 cup slivered almonds
      • 2 Tbsp. olive oil
      • Kosher salt and pepper 
      Directions
      1. Heat oven to 425 degrees. Dust a baking sheet with cornmeal.
      2. Shape the dough into a large 14 inch long rectangle or oval and place on the prepared baking sheet.
      3. In a large bowl, toss the sweet potato, shallots, cheddar cheese, thyme, almonds, oil, salt and pepper. 
      4. Scatter the potato mixture over the dough and bake until golden brown and crisp, 20 to 25 minutes. Serve with salad, if desired.
                                                        
        Easy and so yummy!! Try it out and let me know what you think. Did you make any changes to the recipe that was really good? Tell us what you did so other's can try it too.

        *Here's a tip for slicing the sweet potatoes and shallots. Use a mandolin slicer if you have one. It makes slicing easy and as a result you get really thin, consistent slices. 

        Recipe from Woman's Day 

        Tuesday, November 8, 2011

        My Newfound Love Affair With Squash

        With the change of the season brings the excitement of new seasonal vegetables. As much as I miss heirloom tomatoes, basil and zucchini, I look forward to welcoming broccoli, sweet potatoes and winter squash into our home! Believe it or not I haven't always been a fan of squash. I know... crazy right!?! Well now that I am fully invested in CSA I have made it my mission to try to enjoy squash. I wanted to try incorporating squash into recipes rather than just having pureed squash, not that there is anything wrong with that! I am happy to say that I found a winner!! This recipe, like all the recipes on this blog, can be adapted to suit your taste. 

        Penne With Braised Squash and Greens

        Ingredients
        • 2 teaspoons extra virgin olive oil
        • 4 ounces smoked tofu, cubed
        • 1 medium onion, chopped
        • 3 cloves garlic, minced
        • pinch of red pepper flakes
        • 1 1/2 cups vegetable broth
        • 1 pound butternut squash, peeled and cut into 3/4 inch cubes(about 3 cups)
        • 1 small bunch Swiss chard, stems removed, leaves cut into 1 inch pieces
        • 8 ounces whole wheat penne, rigatoni or fusilli pasta
        • 1/2 cup freshly grated Parmesan cheese
        • 1/4 teaspoon salt, or to taste
        • freshly ground pepper to taste
        Directions

        1. Put a large pot of water on to boil for cooking pasta.
        2. Heat oil in a large nonstick skillet over medium heat. Add tofu and cook, stirring, until lightly browned, 3 to 5 minutes. Transfer to a plate. 
        3. Add onion to the pan; cook, stirring often, until softened and golden, 2 to 3 minutes. Add garlic and crushed red pepper; cook, stirring, for 30 seconds.
        4. Return the tofu to the pan and add broth and squash; bring to a simmer. Cover and cook for 10 minutes.
        5. Add chard and stir to immerse. Cover and cook until the squash and chard are tender, about 5 minutes.
        6. Meanwhile, cook pasta until just tender, 8 to 10 minutes or according to package directions. Drain and return to the pot. 
        7. Add the squash mixture, Parmesan, salt and pepper. Toss to coat.
        I'm so glad that I found this recipe because I LOVE it! The best part about this recipe is that it is easy to adapt to your liking or change it according to what you have for ingredients. For example, I have never seen smoked tofu nor do I have any interest in trying it anytime soon! My family loves tofu so I always have it in my fridge. So for this recipe I use firm or extra firm tofu. Now I'm sure a lot of you are thinking, 'I hate tofu!', and that's fine. I have not tried this recipe with chicken, since we don't eat meat, but I don't see any reason why you couldn't use chicken in place of the tofu. Of course you could also leave the tofu out completely and not substitute it at all. The recipe calls for Swiss chard but kale or spinach would work as well. As for the cheese, Parmesan is great, but the first time I made this I didn't have any Parmesan. I did however have some Gruyere left over from another recipe. Personally I think the Gruyere was even better than the Parmesan! Gruyere cheese has a slight nutty, earthy flavor that pairs really well with the fresh vegetables.

        So if you are not a squash lover, as I was, I encourage you to try this recipe because I really think you'll enjoy it! As always let me know what you think and let me know if you made any substitutions that I didn't think of. Good luck and good eating!